Hi, I’m Jorge Amengol, a fresh graduate student of the Game Development - Advanced Programming course at Fanshawe College, Canada. I started this series of posts to register my own progress throughout the program and also serve as a reference for me on important subjects in the future. Though it is a personal record, you might find the subjects discussed here useful. Feel free to make comments at the end of each post.
Introduction
This course has been a long and demanding journey, but we are finally coming to a topic that I have been waiting since the beginning of it. In fact, this topic drove me to this program at the first place, as I have a background in character animations for Flight Simulators.
The interesting thing with my animation skills however is that I was always trying to understand how the animation itself worked. Like how the key-frames (discreet values) could produce a smooth movement? What a bone really was? How exactly the skin of a character could move around by its bones? etc. Turns out that the Computer Scientist and the Math geek in me was screaming for answers and telling me that I was not quite doing what I really should but was very close. Looking for the answers I found that what I really should be doing was Graphics Programming, more specifically work with Animations from a programmer’s perspective.
Don’t get me wrong, being an animator (artist) is really cool and I do have lots of hours as an animator, but I always felt that I had become one by accident, because of my Flight Simulator Developer history (I will talk about it in the future here). Today I feel that I’m definitely in the right place being a Graphics Programming and my previous experience with animation has being extremely helpful when it comes to understand the programmer side of it. But enough of that, let’s get and overview of what we have being doing in class for the last few weeks for that matter.
Skinned Mesh Animations
Now I’m finally able to answer most of the questions that I had about how a skinned mesh animation works, but first, let me try to explain what it even means.
For some time now, we have been able to move objects around quite easily. To do that, we can just translate an object to a new position using matrices and the magic of Math. We can also do this smoothly using a delta time for each translation and the movement will appear much more natural. Looking back at the first animations that I did in the past using the Gmax suite (a simple version of a 3DS Max) now I know that we can also call those translations animations in the sense that we can move objects around in time.
One key thing of this “animations” is that, if you don’t scale the mesh that you are translating (or rotating), their relative vertex position will always stay the same between each other. That is one of the main differences between a “regular animation” and a “skinned mesh animation”. In the former, all vertices are influenced by only one transformation matrix, while the later will most of the time be affected by more than one. That transformation matrix is what we call bones.
So, a skinned mesh object is a simple mesh object that is transformed by more than one matrix, but how that could be even possible? Well, in fact that is quite easy to understand. Let me try to explain it:
When you translate a mesh in you application what you are really doing is translating every single vertex using the same matrix in the Vertex Shader.
Now imagine having a mesh that half of it is translated by one matrix and the other half by another one? Exactly, now you have a mesh that you can “break” into two, by rotating one side a little bit, for example. But wait, how in the universe that could produce a “skin” behavior for the mesh. It would only make things appear to be cracking you mas say, and you right. There is a little bit more involved in having a “skinned mesh”, but it is also simple to understand.
When we prepare a skinned mesh we usually say that each vertex will be influenced by a number of transformation matrices that we conveniently call bones. (I will call the transformation matrices just bones from now on) This can be really any number but it is usually limited to 4 bones to have good smooth results. So, what happens is that the final transformation of the vertex is a combination of all the bones (matrices) that influence that vertex.
Take a look at the following picture:
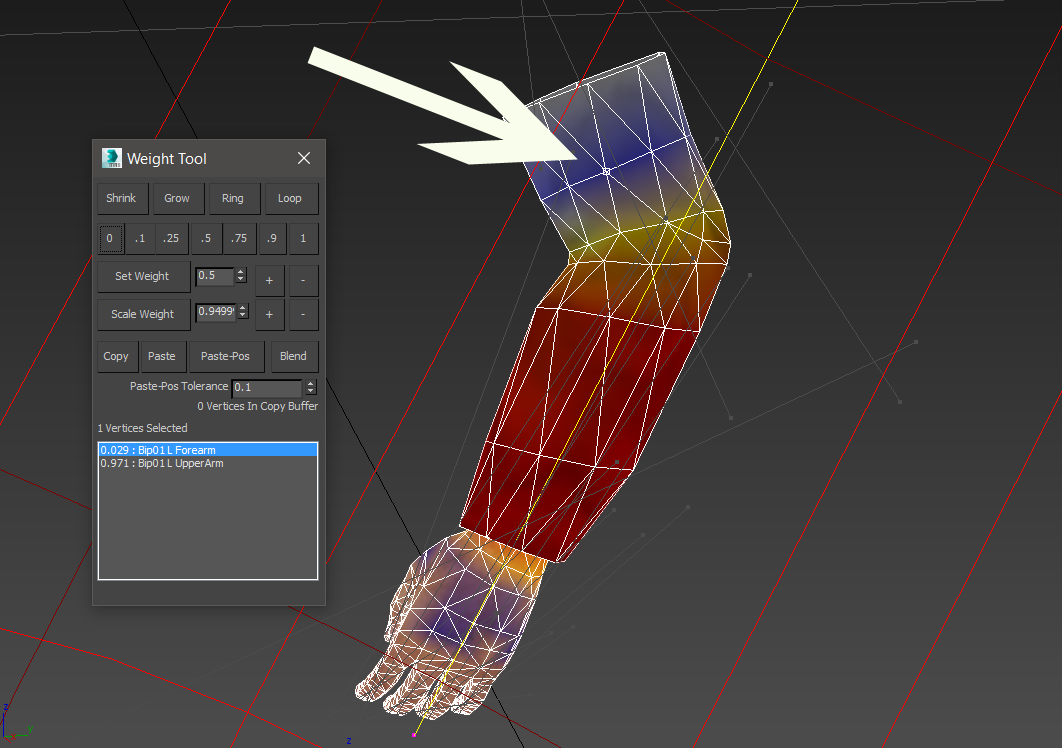 A Skinned Mesh arm in 3DS Max with a vertex selected
There is a lot going on here, but I will try to explain in details what we are seeing.
This is a skinned mesh left arm and the whole mesh is influenced by a few bones: UpperArm, Forearm, hand and the finger bones. One vertex is selected (indicated by the white arrow). That vertex is influenced by two bones (showed in the Weight Tool window). The numbers 0.029 and 0.971 (Weight Tool) says how much each bone influence that vertex. The result must add up to 1. In some cases we have up to 4 bones influencing a vertex. Here these numbers are saying that, the transformation matrix of the bone “Forearm” will contribute with 2.9% and the transformation matrix of the bone “UpperArm” will contribute with 97.1% of the final bone transformation of that specifically vertex.
Now let’s choose a different vertex:
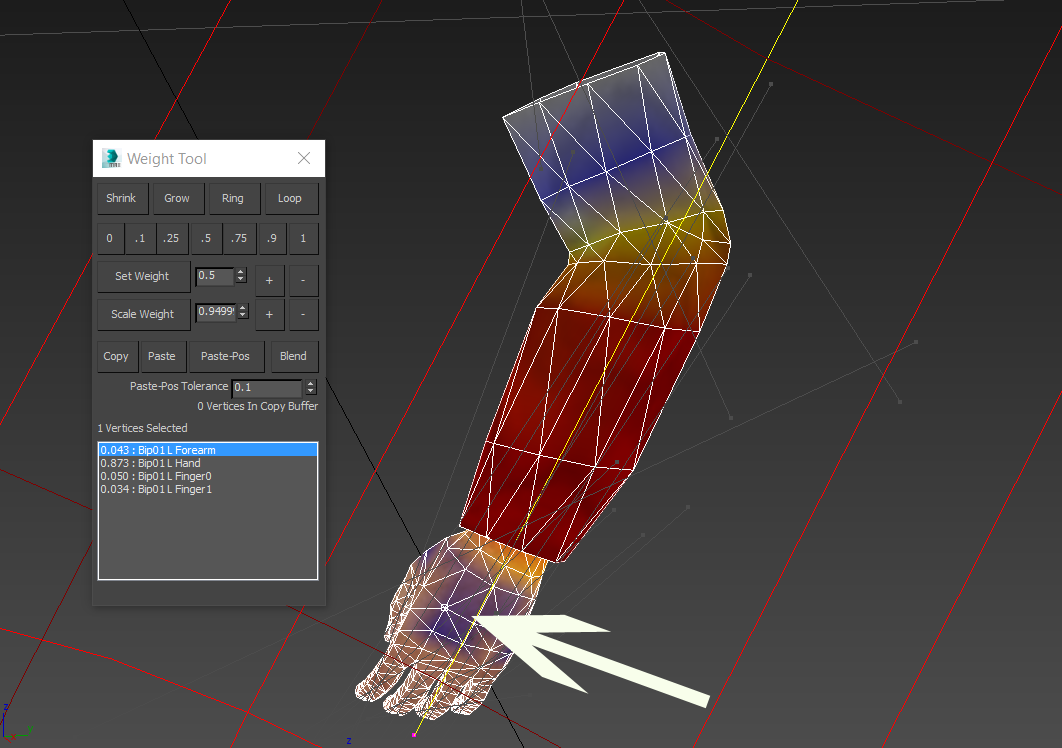 A Skinned Mesh arm in 3DS Max with another vertex selected
As we can see, that vertex is influenced by 4 bones: Forearm, Hand, Finger0 and Finger1. This is exactly what gives the smooth skin movement of a skinned mesh when it is translated. But you may now be concerned about these values and how you can generate them efficiently. Well, we should not, those values are produced by the artists when they are modeling and rigging the mesh, so we are good.
Finally, what is going on with all these colors that we are seeing on the image? Those colors are more important to artists too, because what they do is to “paint” the mesh representing what areas are more influenced by a bone than others. In this specific example, the forearm bone is selected and the red color represents the area with the most effect on the vertices. The transition from Red to Blue to none (or just the regular color of the mesh) represents the transition from 1.0 to 0.0 of the bone influences.
Conclusion
We saw here just a brief overview about skinned mesh animations and some fundamental notions. We also saw that a bone is just a good name for a transformation matrix when we are talking about skinned animations. For the next posts I will try to talk a little bit more about it and how this kind of animation would look like from the perceptive of the vertex shader.
I hope this has helped you in any way. Please feel free to leave a comment or, if you want to contact me, use any means at the bottom of this page.
Have fun coding,
Jorge Amengol.